 |
The Toolbar
|
| |
This file explains the row of controls near the top of the
screen. There are over a dozen, but don't worry about
memorizing them; holding the mouse pointer over any control for
a second or so will show the name and hotkey for that control.
The sections of this file are:
|
Mouse Drag Mode
|
| |

These three buttons determine what happens when you drag an
object with the mouse. Only one of them can be pressed at a
time.
If the first button (Select) is pressed, dragging the
mouse has no effect. This is a good choice when you've got all
of your ships right where you want them, and don't want to
accidentally move something.
The second button (Select and Move) is pressed by
default. This lets you move objects by dragging them with the
mouse.
The third button (Select and Rotate) lets you rotate
objects without changing their position. The direction of
rotation depends on the Axis
Constraints.
The speed of movement and rotation is controlled by the Speed Menu.
|
Rotate Locally
|
| |

This button determines what happens if you rotate several
marked objects. When it is not pressed, the entire group
rotates, as if they were connected to each other by invisible
sticks. When it is pressed, each object rotates without
changing its position, sort of like a marching band turning a
corner.
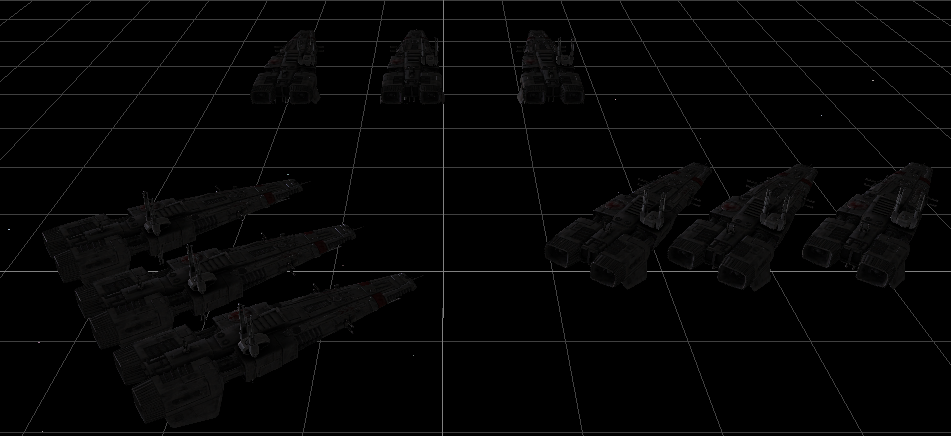
The picture below shows three groups of Bolithos. The group
on the left has been rotated non-locally, while the group on
the right has been rotated locally.

|
Axis Constraints
|
| |

FreeSpace 2 missions take place in three-dimensional space,
but the mouse can only control two dimensions at a time. These
buttons determine which dimensions objects move along when you
drag them with the mouse. For example, if X is pressed,
you can drag a ship along the X axis, but its Y
and Z positions will not change.
If you have the Mouse Drag
Mode set to Select and Rotate, the axis constraints
refer to the axes relative to the object in question,
not the normal location axes. Rotating around the X axis
is pitching up and down, rotating around the Y axis is
yawing left and right, and rotating around the Z axis is
rolling left and right.
|
Select List
|
| |

This button lets you change which objects are marked. When you
have dozens of objects in your mission, this can be easier than
marking things with the mouse.
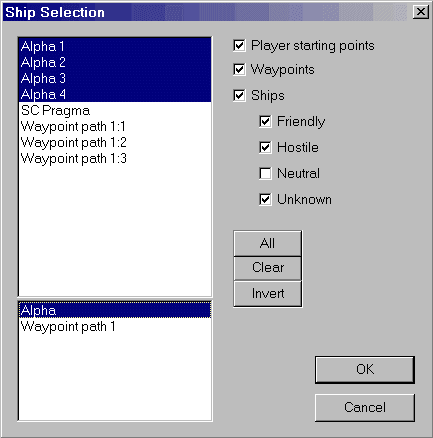
When pressed, this button pops up a dialog box. All objects
in the mission are listed in the upper left. Click on an
object's name to highlight it, and ctrl click to highlight
additional objects.

You can filter out various kinds of objects by unchecking
the boxes in the upper right. (Player Starting Points
are ships flown by players.)
The All button highlights everying. Clear
removes all highlighting. Invert highlights all of the
unhighlighted objects, and vice versa.
The box in the lower left lists wings and waypoint paths.
Click on one to highlight all of the objects in that group.
Close the dialog box with Okay to mark the
highlighted objects (and unmark everything else), or
Cancel to discard your changes.
|
Selection Lock
|
| |

When this button is pressed, clicking with the mouse does not
change what is marked. Instead, it acts as if you dragged the
currently marked objects to the spot where you clicked.
|
Form / Disband Wing
|
| |

These buttons let you group ships (usually fighters) into
wings, or break up those wings.
The Form Wing button puts all of the marked ships
into a wing. It pops up a dialog box asking for the name of the
new wing. If some of the marked ships are already in a wing,
you will be given the opportunity to reform that wing, that is,
redefine it to consist of the currently marked ships. When
ships are grouped into a wing, their names are changed to
reflect this.
Disband Wing breaks up the marked wing. The ships
remain where they are.
You can put as many as six ships in a wing. If a fighter or
bomber wing is going to show during the loadout screen (where
you select which ships and weapons it has, it can have at most
four ships.
For cooperative multiplayer missions, the players must be in
Alpha, Beta, and Gamma wings. For team vs. team multiplayer
missions, the players must be in Alpha and Zeta wings.
Ships in a wing want to stay together, and want to be in
particular positions within the wing. If you place them too
closely together, they may crash into each other while
maneuvering into place at the beginning of the mission.
|
Zoom
|
| |

These buttons let you zoom in or out to see just the things you
want. Of course, you can also move the camera manually.
Zoom Selected moves the camera forward or back so
that the marked objects are all visible.
Zoom Extents moves the camera forward or back so that
all objects in the mission are visible.
|
Show Distances
|
| |

When this button is pressed, you will see the distances between
marked objects, as in the picture below.

|
Rotate Around Object
|
| |

When this button is pressed, the currently selected object is
centered. The Camera Movement
Keys now act differently: keypad 4 and 6 move left and
right in a circle around the object, keypad 2 and 8 move up and
down in a circle around the object, and A and Z move toward and
away from the object. The other camera movement keys don't do
anything in this mode.
If nothing is selected, this button has no effect. Be very
careful about moving objects in this mode. It's very easy to
pick up an object and move it 30km away by accident.
|
Selection Box
|
| |
 The last control on the Toolbar, and probably the most useful,
is the Selection Box. Clicking on the triangle at the
right side pops up a menu from which you can select any of the
ship types in the game, as well as special objects like
waypoints, jump nodes, and lone asteroids. (If you want an
asteroid field, use the Asteroid Field Editor.)
The selected object type will be created when you ctrl click
with the mouse in the main area of the FRED window.
If you have a waypoint selected when you place a new
waypoint, the new one will be added to the same path (right
after the selected one). Otherwise, the new waypoint will be in
a new path.
|
|


